How to Block Websites on Mac: 5 Methods Compared
The fastest way to block a website on a Mac is Screen Time. Go to System Settings › Screen Time › Content & Privacy and add the site to the Restricted list. Apple only documents that restriction for Safari, though. To block a site in every browser, add it to the hosts file or switch the Mac to a filtering DNS server.
Whichever method you choose, one rule matters more than the method itself. The person being blocked needs a standard (non-admin) account. Anyone with the admin password can undo every method below in about a minute.
Which method fits your situation?
The right choice depends mostly on who the block is for. When you’re blocking yourself, the point is friction. You want a block that is annoying enough to undo that the urge passes first, and ideally one you can lock until a timer runs out. When you’re blocking a child, what matters is control: they can’t have admin rights, and the filter should work in every browser and app they might open.
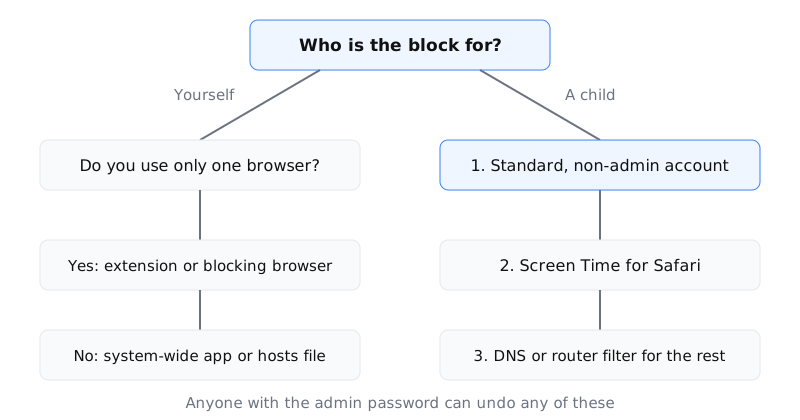
Here is what each method covers:
| Method | Cost | Covers | Main weakness |
|---|---|---|---|
| Screen Time | Free, built in | Safari | Other browsers |
| Hosts file | Free | Safari, Chrome, current Firefox | One line per domain, no wildcards |
| DNS filter | Free tiers | The whole Mac | Private Relay, browser Secure DNS, VPNs |
| Router | Free if supported | Every device on your Wi-Fi | Mobile data, VPNs; features vary by router |
| Blocking app | Free to paid | Depends on the app | Varies; see below |
How do you block a website with Screen Time?
Screen Time is built into macOS Catalina (10.15) and later, so there’s nothing to install. The steps below follow Apple’s current guide:
- Choose Apple menu › System Settings, then click Screen Time in the sidebar.
- If you manage a child’s account through Family Sharing, pick their name from the menu at the top.
- Click Content & Privacy and turn it on.
- Click App Store, Media, Web, & Games.
- Under Safari’s web content setting, choose Limit Adult Websites, then click Customize.
- Under Restricted, click Add and enter the site, for example
reddit.com. Click Done.
On older versions such as macOS Ventura, the path is Content & Privacy › Content Restrictions › Access to Web Content (Apple’s Ventura guide).
For a young child, Allowed Websites Only is stricter. Every site is blocked except the ones you approve.
What Screen Time won’t do
Apple lists these restrictions under Safari and doesn’t say they apply to Chrome, Firefox or anything else. Assume they won’t, and cover other browsers with one of the methods below. You also can’t block categories such as games or social media. The only options are Apple’s adult-content filter and your own allow and restrict lists. If you mainly use Chrome, the guide to blocking websites on Chrome goes into more detail.
How do you block a site in every browser with the hosts file?
Before your Mac asks the network for a website’s address, it checks a small file at /etc/hosts. If you point a domain at 127.0.0.1 (your own Mac), the site won’t load. You make the change in Terminal, and it takes about five minutes.
- Open Terminal: press Command-Space, type Terminal and press Return.
- Back up the file:
sudo /bin/cp /etc/hosts /etc/hosts-originalEnter your admin password when asked. Nothing appears on screen while you type it, which is normal.
- Open the file in the nano editor:
sudo nano /etc/hosts- Move to the bottom of the file and add one line for each domain:
127.0.0.1	reddit.com
127.0.0.1	www.reddit.com
127.0.0.1 old.reddit.com- Press Control-O and then Return to save, and Control-X to exit.
- Flush the DNS cache so the change takes effect right away:
sudo dscacheutil -flushcache; sudo killall -HUP mDNSResponderTo undo everything, restore the backup with sudo /bin/cp /etc/hosts-original /etc/hosts and flush the cache again. To remove a single site, open the file, delete its lines, save and flush.
Where the hosts file works, and where it doesn’t
It applies in Safari, in Chrome and in current Firefox. Chromium’s DNS documentation says Chrome’s built-in resolver reads the hosts file even when Secure DNS is on. Mozilla’s DNS-over-HTTPS docs say domains listed in the hosts file are left out of its encrypted lookups. Older Firefox versions did ignore the file when DNS over HTTPS was on.
There are three gaps. The hosts file has no wildcards, so a subdomain you didn’t list (such as m. or old.) still loads. A VPN or proxy that looks up addresses remotely goes around the file. And some apps connect to hardcoded IP addresses. Only an admin can edit the file, so on a standard account the block holds.
How do you set up a web filter on a Mac with DNS?
A filtering DNS server refuses to look up addresses for blocked sites, so they fail everywhere on the Mac. You don’t install any software. This is also the best answer if you’re looking for a general “web filter” for a child’s Mac.
To switch servers, open System Settings › Network, click your connection (usually Wi-Fi), click Details and then DNS. Remove the existing entries with the minus button, add the provider’s two addresses with the plus button, and click OK.
| Service | Addresses | What it blocks | Cost |
|---|---|---|---|
| OpenDNS FamilyShield | 208.67.222.123, 208.67.220.123 | Adult content | See Cisco’s page |
| CleanBrowsing Family | 185.228.168.168, 185.228.169.168 | Adult content, proxies, VPNs, mixed-content sites | Free filter |
| CleanBrowsing Adult | 185.228.168.10, 185.228.169.11 | Adult content | Free filter |
| NextDNS | Personal, from your dashboard | Your own blocklists, including specific sites | Free up to 300,000 queries a month; Pro $1.99/month or $19.90/year |
NextDNS prices were checked on September 30, 2026. Of these options, only NextDNS lets you block specific sites such as Reddit or YouTube on the free tier. FamilyShield and CleanBrowsing’s free filters block adult content and some security risks, not social media. On the free NextDNS plan, once you go past 300,000 queries in a month, it keeps resolving addresses but stops blocking until the next month.
Two settings that get around a DNS filter
iCloud Private Relay. When Private Relay is on, it covers browsing in Safari (Apple). Filtering vendors such as Control D and DNSFilter document that this can send Safari’s lookups past your filter. Turn Private Relay off in iCloud settings on a Mac you’re filtering.
Browser Secure DNS. Chrome and Firefox can send DNS lookups to their own provider and skip the Mac’s DNS setting. In Chrome, open chrome://settings/security and look for Use secure DNS. Either turn it off or set it to your filtering provider (CleanBrowsing’s walkthrough).
A VPN also goes around a DNS filter, and any admin can switch DNS servers back in seconds. On a child’s Mac, both points come back to the standard account.
Can you block websites for every device from the router?
Yes, if your router supports it. Blocking at the router covers phones, tablets and guest devices as well as the Mac. To find the router’s address on the Mac, go to System Settings › Network › Wi-Fi › Details › TCP/IP and look at the number next to Router (often 192.168.1.1). Type it into a browser and sign in with the router’s admin password.
The feature has different names depending on the brand: Access Control, URL Filter, Parental Controls or Website Blocking. Check your router maker’s documentation for the exact steps. If your router has no blocking feature, set its DNS servers to one of the filters above, which gives every device on the network the same filter. Neither option does anything once a phone switches to mobile data. For phones and tablets, see how to block websites on iPhone and iPad.
Which blocking apps work on a Mac?
Apps are the better fit when you’re blocking yourself. They add schedules and timers you can’t cancel, and several can also block desktop apps. Prices below were checked on September 30, 2026.
| App | Platforms | Price | How it blocks |
|---|---|---|---|
| SelfControl | macOS | Free, open source | System-wide timer that can’t be cancelled |
| Cold Turkey | macOS, Windows | Free; Pro is a one-time purchase (see pricing page) | Websites; Pro adds apps, schedules, locks |
| Freedom | macOS, Windows, iOS, Android, Chromebook | Limited free tier; $8.99/month, $3.33/month billed yearly, or $99.50 lifetime | Synced blocking across devices |
| Focus | macOS | $49 one-time (1 year of updates) or $129 lifetime | Focus sessions for sites and apps |
| 1Focus | macOS 10.15+ | Free; Pro $1.99/month or $9.99/year | Safari, Chrome, Brave, Edge, Opera, Arc |
| Browwwser | macOS 12+ | $99/year or $199 lifetime | Blocking built into the browser |
SelfControl blocks a list of sites until the timer ends. Restarting the Mac or deleting the app doesn’t stop the block. It has no schedules. Our SelfControl comparison explains where it falls short.
Cold Turkey’s free version blocks websites. Pro adds app blocking, scheduling, locking and breaks. One key covers all your personal computers, and there’s a 30-day refund. See the Cold Turkey comparison.
Freedom is the one to pick if your phone is the bigger problem, because one session blocks your Mac and phone together. Locked Mode and scheduling require Premium. See the Freedom comparison.
Focus includes a 7-day trial and a 30-day money-back guarantee. 1Focus limits category, schedule and keyword blocking to Pro, which has a 14-day trial.
Where Browwwser fits
Browwwser is a Chromium-based browser for macOS with blocking built into the browser itself, so there’s no extension to switch off. A blocked site doesn’t load, and there’s no “continue anyway” button. You can set recurring schedules, use one-click presets for social media, news, video and shopping, and have it close blocked Mac apps such as Discord while blocking is active. Lock mode freezes the blocklist for 1 hour, 1 day or 1 week, with no override and no password reset. You can import your Chrome bookmarks, passwords and extensions in one click.
The limit is simple: it only blocks inside Browwwser. If you open Safari or Chrome, the sites load there. It suits people who are willing to make it their only browser, and it’s paid after the 7-day trial, with a 14-day money-back guarantee (pricing). If you switch browsers when you’re tempted, choose SelfControl, Cold Turkey or a DNS filter instead, or pair Browwwser with one of them.
What about browser extensions?
Extensions are the lightest option and also the easiest to get around: you turn one off, or open a different browser. LeechBlock NG is free, open source and actively maintained (version 1.7.3, updated August 5, 2026). StayFocusd is published by Sensor Tower, Inc. Its privacy policy says it collects “stats on which websites you visit” to build anonymized products for sale, and that it will “never sell your personal information to advertising platforms, data brokers”. For a longer comparison, see the best website blockers.
What gets around each method?
Each method blocks at a different point between you and the website, and each has a known way around it. Once you know where a method blocks, it’s easier to see which two to combine.
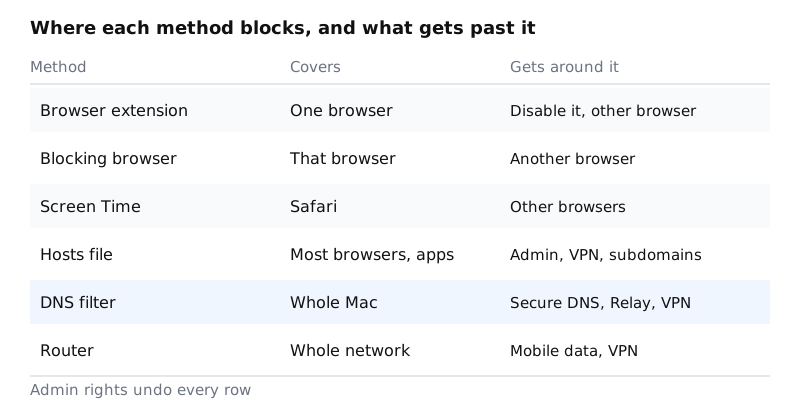
The combinations that work in practice:
- For a child: a standard account, Screen Time for Safari, and a DNS filter with Private Relay and Chrome’s Secure DNS turned off. Add router DNS if you want every device covered.
- For yourself, if you switch browsers when tempted: a system-wide timer such as SelfControl or Cold Turkey, or the hosts file.
- For yourself, if you stick to one browser: a blocking browser or an extension with a schedule, plus a lock so that stopping the block takes longer than the urge lasts.
The hosts file and DNS filtering overlap. Using both mainly catches mistakes, such as a subdomain you forgot to list. It doesn’t add much protection against someone who has the admin password.
We built the #1 browser
for |
A macOS browser that blocks distracting sites and apps at the OS level.
Try it free for 7 daysWant distracting sites to stay blocked during work hours? Browwwser builds blocking into the browser itself, with scheduled blocks and a lock mode that has no override.
Try it free for 7 days